Creating Your First Application
You can create MVC 4 Web Application by using visual C# or Visual Basic.Go to File=>Select New=>Project and click on Project..Select ASP.NET MVC 4 web Apllication and name your project as MvcEmployee and click OK.

In MvcEmployee Project dialog box select Internet Application.Leave Razor as default View Engine.And click OK.
By default we get Home Controller And Account Controller

Now Add Class to Model folder in the Application and name it as Employee
In Employee Class write the below code.
public class Employee
{
[Key]
public int Id { get; set; }
public string Name { get; set; }
public string Gender { get; set; }
public string DateofBirth { get; set; }
public string Address { get; set; }
public int Salary { get; set; }
}

Add [Key] attribute above id....using System.ComponentModel.DataAnnotations namespace
Go to Web.config file and change the connection string as
<connectionStrings>
<add name="EmployeeDb" connectionString="Persist Security Info=False;User ID=sa;Password=007;Data Source=USER-30\SQLEXPRESS2K8;Initial Catalog=aspnet-MvcEmployee-20131105123901" providerName="System.Data.SqlClient" />
</connectionStrings>
Now go to Tools--->Library Package Manager--->click on Package Manager
Console
Write the following in PM Console
Enable-Migrations
and press Enter Key
Now getting following error
More than one context type was found in the assembly 'MvcEmployee'.
To enable migrations for MvcEmployee.Models.UsersContext, use Enable-Migrations -ContextTypeName MvcEmployee.Models.UsersContext.
To enable migrations for MvcEmployee.Models.DataContext, use Enable-Migrations -ContextTypeName MvcEmployee.Models.DataContext.
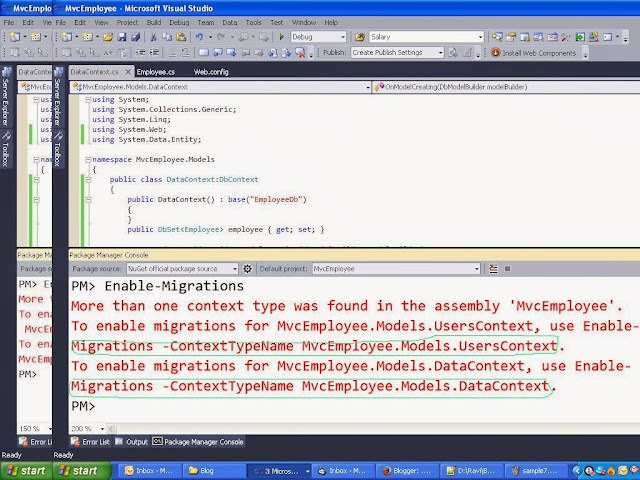
Now write the following in PM Console
Enable-Migrations -ContextTypeName MvcEmployee.Models.DataContext
and press Enter key
Now you saw the following message in PM Console
Checking if the context targets an existing database...
Code First Migrations enabled for project MvcEmployee.
Now observe the solution explorer.The New folder is added named as Migrations.In configuration.cs change the following code
public Configuration()
{
AutomaticMigrationsEnabled = true;
AutomaticMigrationDataLossAllowed = true;
}

Add another class to Model folder name it as DataContext Class.
add MvcEmployee.Migrations namespace to the DataContext class.
and write the following code in Datacontext class
Add following namespace using System.Data.Entity;
public class DataContext:DbContext
{
public DataContext() : base("EmployeeDb")
{
}
public DbSet<Employee> employee { get; set; }
protected override void OnModelCreating(DbModelBuilder modelBuilder)
{
base.OnModelCreating(modelBuilder);
Database.SetInitializer(new MigrateDatabaseToLatestVersion<DataContext, Configuration>());
modelBuilder.Entity<Employee>().ToTable("employee");
}
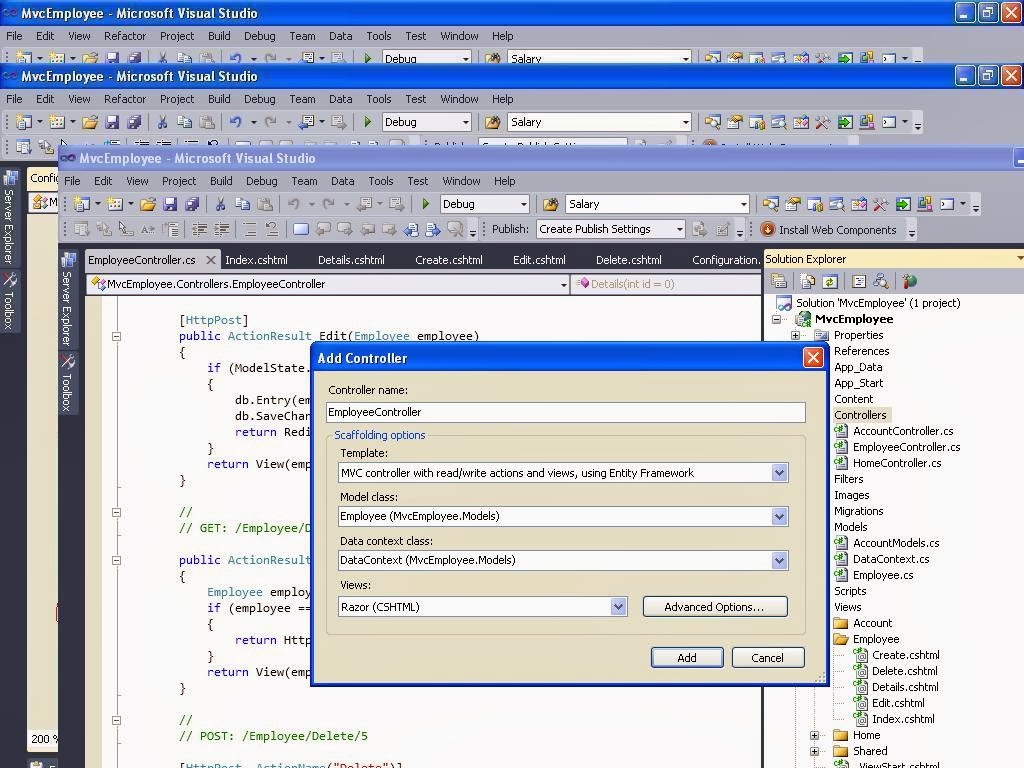
} Now add the controller Name it as Employee
Go to Controller folder Right click==>Add==>click on Controller
Now Change The Controller Name as EmployeeController and select template
Mvc Controller with read/write actions and views ,using Entity Framework
Select Model Class as Employee (MvcEmployee.Models)
and select Data Context Class as DataContext (MvcEmployee.Models)
Now Click on Add
Now run the application and append the Employee to the url
observe the following screen shot

Now go to Database observe the database is created or not


 We can edit , update and delete the records.This is the example for sample Mvc Application using Code first.
Key words: Sample Mvc 4 application, Sample Mvc 4 application using code first,Mv4 project,code first example in mvc4,asp.net mvc4 application,asp.net mvc4 application using code first
You can create MVC 4 Web Application by using visual C# or Visual Basic.Go to File=>Select New=>Project and click on Project..Select ASP.NET MVC 4 web Apllication and name your project as MvcEmployee and click OK.

In MvcEmployee Project dialog box select Internet Application.Leave Razor as default View Engine.And click OK.
By default we get Home Controller And Account Controller

Now Add Class to Model folder in the Application and name it as Employee
In Employee Class write the below code.
public class Employee
{
[Key]
public int Id { get; set; }
public string Name { get; set; }
public string Gender { get; set; }
public string DateofBirth { get; set; }
public string Address { get; set; }
public int Salary { get; set; }
}
Add [Key] attribute above id....using System.ComponentModel.DataAnnotations namespace
Go to Web.config file and change the connection string as
<connectionStrings>
<add name="EmployeeDb" connectionString="Persist Security Info=False;User ID=sa;Password=007;Data Source=USER-30\SQLEXPRESS2K8;Initial Catalog=aspnet-MvcEmployee-20131105123901" providerName="System.Data.SqlClient" />
</connectionStrings>
Now go to Tools--->Library Package Manager--->click on Package Manager
Console
Write the following in PM Console
Enable-Migrations
and press Enter Key
Now getting following error
More than one context type was found in the assembly 'MvcEmployee'.
To enable migrations for MvcEmployee.Models.UsersContext, use Enable-Migrations -ContextTypeName MvcEmployee.Models.UsersContext.
To enable migrations for MvcEmployee.Models.DataContext, use Enable-Migrations -ContextTypeName MvcEmployee.Models.DataContext.

Now write the following in PM Console
Enable-Migrations -ContextTypeName MvcEmployee.Models.DataContext
and press Enter key
Now you saw the following message in PM Console
Checking if the context targets an existing database...
Code First Migrations enabled for project MvcEmployee.
Now observe the solution explorer.The New folder is added named as Migrations.In configuration.cs change the following code
public Configuration()
{
AutomaticMigrationsEnabled = true;
AutomaticMigrationDataLossAllowed = true;
}

Add another class to Model folder name it as DataContext Class.
add MvcEmployee.Migrations namespace to the DataContext class.
and write the following code in Datacontext class
Add following namespace using System.Data.Entity;
public class DataContext:DbContext
{
public DataContext() : base("EmployeeDb")
{
}
public DbSet<Employee> employee { get; set; }
protected override void OnModelCreating(DbModelBuilder modelBuilder)
{
base.OnModelCreating(modelBuilder);
Database.SetInitializer(new MigrateDatabaseToLatestVersion<DataContext, Configuration>());
modelBuilder.Entity<Employee>().ToTable("employee");
}
} Now add the controller Name it as Employee
Go to Controller folder Right click==>Add==>click on Controller
Now Change The Controller Name as EmployeeController and select template
Mvc Controller with read/write actions and views ,using Entity Framework
Select Model Class as Employee (MvcEmployee.Models)
and select Data Context Class as DataContext (MvcEmployee.Models)
Now Click on Add
Now run the application and append the Employee to the url
observe the following screen shot

Now go to Database observe the database is created or not
Click on Create New and add one record and corresponding record in database table.
Key words: Sample Mvc 4 application, Sample Mvc 4 application using code first,Mv4 project,code first example in mvc4,asp.net mvc4 application,asp.net mvc4 application using code first