In this article i am going to explain CRUD operations in WCF services using Entity Framework.First create one Customer Table in database.Now i want to get all the customers data from database for this i implemented one method called GetCustomers like this i implemented different methods for inserting data into database table,Update data into Customers table and deleting customers.
Create Customer table in Database
In customer table fields are CustomerId,CustomerName,Address,Email.


Right click on the ‘CustomerServices’ project in Solution Explorer > Add > New Item. Select the Data Template > ADO.NET Entity Data Model and click Add.

Now select Generate from database and click on Next


click on New Connection

Write the server name with in textbox .if you are using Sql Server Authentication then fill username and password, and select database which you are using. click on OK.
Now you get the following screen ,check the check box having Yes,include the sensitive data in connection string. Now click on Next

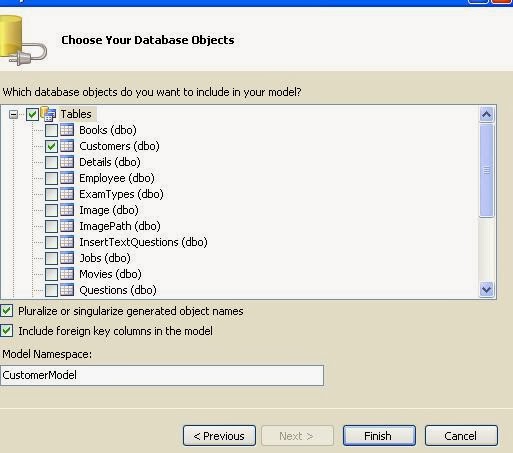
Now select customer table and click on finish. you get the following entity model

Now change the Customer name to CustomerEntity because the project has already one Customer class in Iservice1.cs file.
To change class name right click on Customer and click on Rename and change it to CustomerEntity
Now go to Service1.svc.cs file and write the method for Getting customers data from database
public List<Customer> GetCustomers()
{
Customer customer=null;
List<Customer> lstcust = new List<Customer>();
using(var context=new RaviEntities())
{
var customerEntity = (from cust in context.CustomerEntities select cust).ToList();
if (customerEntity != null)
foreach (var cust in customerEntity)
{
customer = new Customer();
customer.CustomerId = cust.CustomerId;
customer.CustomerName = cust.CustomerName;
customer.Address = cust.Address;
customer.Email = cust.Email;
lstcust.Add(customer);
}
}
return lstcust;
}
Implement the method for inserting data into customer table
public bool InsertCustomer(Customer obj)
{
CustomerEntity objcust = new CustomerEntity()
{
CustomerId = obj.CustomerId,
CustomerName = obj.CustomerName,
Address = obj.Address,
Email = obj.Email
};
RaviEntities db = new RaviEntities();
db.CustomerEntities.AddObject(objcust);
// db.AddToCustomerEntities(objcust);
db.SaveChanges();
return true;
}
Implement the method for update data into customer table
public bool UpdateCustomer(Customer obj)
{
var custId = obj.CustomerId;
using (RaviEntities context = new RaviEntities())
{
var customerEntity = (from c in context.CustomerEntities where c.CustomerId == custId select c).Single();
if (customerEntity != null)
{
customerEntity.CustomerId = obj.CustomerId;
customerEntity.CustomerName = obj.CustomerName;
customerEntity.Address = obj.Address;
customerEntity.Email = obj.Email;
context.CustomerEntities.DeleteObject(customerEntity);
context.SaveChanges();
context.AddToCustomerEntities(customerEntity);
context.SaveChanges();
}
}
return true;
}
Implementing Method for Deleting the customer
public bool DeleteCustomer(int cid)
{
using (RaviEntities context = new RaviEntities())
{
var customerEntity = (from c in context.CustomerEntities where c.CustomerId == cid select c).Single();
if (customerEntity != null)
{
context.CustomerEntities.DeleteObject(customerEntity);
context.SaveChanges();
}
}
return true;
}
Now run the application and copy the url
http://localhost:3970/Service1.svc
Check wcf services are working are not
How to check Wcf Services :

 Go to Visual Studio Command Prompt and type wcftestclient and click Enter key. Now it opens another window

Now click on addservice and paste that url and click OK. you get the all methods in the services
For Getting All Customers ..double click on the method.=>Click on Invoke=> Select Ok
Now you get the following output
Similarly you can check all the methods like this.
Create Customer table in Database
In customer table fields are CustomerId,CustomerName,Address,Email.
Now go to Visual Studio . Follow this path ,File=>New=>Project =>WcfServiceApplication and name it as CustomerServices and click OK
Go to Iservice1.cs file and write the following code in Iservice1 interface
[ServiceContract]
public interface IService1
{
[OperationContract]
string GetData(int value);
[OperationContract]
CompositeType GetDataUsingDataContract(CompositeType composite);
// TODO: Add your service operations here
[OperationContract]
List<Customer> GetCustomers();
[OperationContract]
bool InsertCustomer(Customer obj);
[OperationContract]
bool UpdateCustomer(Customer obj);
[OperationContract]
bool DeleteCustomer(int cid);
}
write another class named as Customer in Iservice1.cs
[DataContract]
public class Customer
{
[DataMember]
public int CustomerId { get; set; }
[DataMember]
public string CustomerName { get; set; }
[DataMember]
public string Address { get; set; }
[DataMember]
public string Email { get; set; }
}
public class Customer
{
[DataMember]
public int CustomerId { get; set; }
[DataMember]
public string CustomerName { get; set; }
[DataMember]
public string Address { get; set; }
[DataMember]
public string Email { get; set; }
}
Right click on the ‘CustomerServices’ project in Solution Explorer > Add > New Item. Select the Data Template > ADO.NET Entity Data Model and click Add.
Now select Generate from database and click on Next
click on New Connection
Write the server name with in textbox .if you are using Sql Server Authentication then fill username and password, and select database which you are using. click on OK.
Now you get the following screen ,check the check box having Yes,include the sensitive data in connection string. Now click on Next
Now select customer table and click on finish. you get the following entity model
Now change the Customer name to CustomerEntity because the project has already one Customer class in Iservice1.cs file.
To change class name right click on Customer and click on Rename and change it to CustomerEntity
Now go to Service1.svc.cs file and write the method for Getting customers data from database
public List<Customer> GetCustomers()
{
Customer customer=null;
List<Customer> lstcust = new List<Customer>();
using(var context=new RaviEntities())
{
var customerEntity = (from cust in context.CustomerEntities select cust).ToList();
if (customerEntity != null)
foreach (var cust in customerEntity)
{
customer = new Customer();
customer.CustomerId = cust.CustomerId;
customer.CustomerName = cust.CustomerName;
customer.Address = cust.Address;
customer.Email = cust.Email;
lstcust.Add(customer);
}
}
return lstcust;
}
Implement the method for inserting data into customer table
public bool InsertCustomer(Customer obj)
{
CustomerEntity objcust = new CustomerEntity()
{
CustomerId = obj.CustomerId,
CustomerName = obj.CustomerName,
Address = obj.Address,
Email = obj.Email
};
RaviEntities db = new RaviEntities();
db.CustomerEntities.AddObject(objcust);
// db.AddToCustomerEntities(objcust);
db.SaveChanges();
return true;
}
Implement the method for update data into customer table
public bool UpdateCustomer(Customer obj)
{
var custId = obj.CustomerId;
using (RaviEntities context = new RaviEntities())
{
var customerEntity = (from c in context.CustomerEntities where c.CustomerId == custId select c).Single();
if (customerEntity != null)
{
customerEntity.CustomerId = obj.CustomerId;
customerEntity.CustomerName = obj.CustomerName;
customerEntity.Address = obj.Address;
customerEntity.Email = obj.Email;
context.CustomerEntities.DeleteObject(customerEntity);
context.SaveChanges();
context.AddToCustomerEntities(customerEntity);
context.SaveChanges();
}
}
return true;
}
Implementing Method for Deleting the customer
public bool DeleteCustomer(int cid)
{
using (RaviEntities context = new RaviEntities())
{
var customerEntity = (from c in context.CustomerEntities where c.CustomerId == cid select c).Single();
if (customerEntity != null)
{
context.CustomerEntities.DeleteObject(customerEntity);
context.SaveChanges();
}
}
return true;
}
Now run the application and copy the url
http://localhost:3970/Service1.svc
Check wcf services are working are not
How to check Wcf Services :
Now click on addservice and paste that url and click OK. you get the all methods in the services
For Getting All Customers ..double click on the method.=>Click on Invoke=> Select Ok
Now you get the following output

Similarly you can check all the methods like this.


